Scenarios
All scenarios added to the server can be found via the "Scenarios"
tab. Once you have uploaded a scenario you may wish to: assign
access; edit scenario details or play the scenario.
Scenario colour coding: At the top of the "Scenarios" page is a key (see screen shot below) denoting the availability of scenarios. The access rights of a listed scenario are: "Access now closed" (the scenario had a set start and end date, and the end date has passed), "Now Available" (has either no restrictions or a future date has been reached), or "Future Access" (has a future date set). These dates are set in the "Upload Scenario" page.
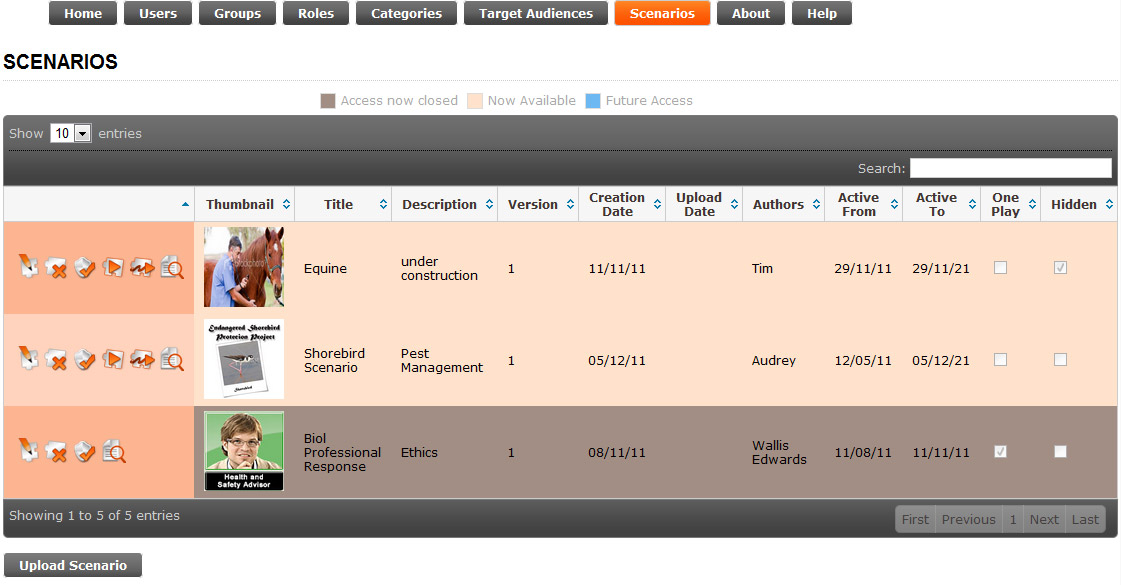
Action Icons:
The icons on the left of a listed scenario are as follows:
![]() Edit:
Edit allows you to change the meta data and settings of the
selected scenario. See 'Edit Scenario Details page' for more information
on this.
Edit:
Edit allows you to change the meta data and settings of the
selected scenario. See 'Edit Scenario Details page' for more information
on this.
![]() Delete: Allows you to delete a scenario. Before a scenario is deleted
you will be taken to a confirmation page where you must select
the delete button again to proceed with the deletion. Click the
back to list button to cancel the delete option.
Delete: Allows you to delete a scenario. Before a scenario is deleted
you will be taken to a confirmation page where you must select
the delete button again to proceed with the deletion. Click the
back to list button to cancel the delete option.
WARNING: There is no undo once a deletion
has occurred. You would need to consult your systems
administrator to perform a recovery in the event you mistakenly
delete a scenario. Also please note that log files associated
with a scenario are also deleted with the deletion of a
scenario.
![]() Permissions:
The permissions button opens the group permissions page where
you can select the user groups that should have access to the
scenario. Please see Groups & Permissions for more
information on this topic.
Permissions:
The permissions button opens the group permissions page where
you can select the user groups that should have access to the
scenario. Please see Groups & Permissions for more
information on this topic.
![]() Play:
The Play button will start the scenario from the
beginning.
Play:
The Play button will start the scenario from the
beginning.
TIP: If you had already started a scenario
from a previous session the Play option will ask if you wish to
start the scenario from the beginning or continue with the last
session.
![]() Continue:
This will start the scenario from the last point in the scenario
was left.
Continue:
This will start the scenario from the last point in the scenario
was left.
![]() View Logs:
Allows you to view a list of users who have used the Scenario. See 'User Logs' for more information.
View Logs:
Allows you to view a list of users who have used the Scenario. See 'User Logs' for more information.
Upload Scenario
Upload: Upload a scenario by clicking on the "Upload Scenario" button located at the bottom left of the page.
Upload Scenario page (note all fields must be filled in)
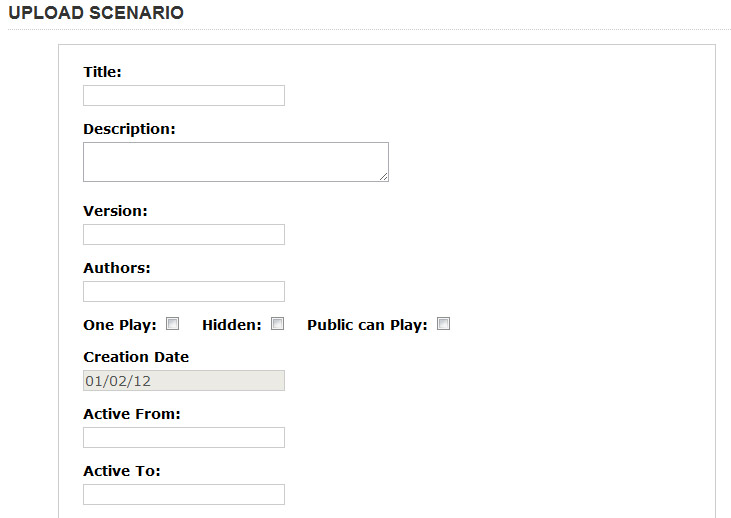
Title:This is the title of your scenario and will appear within the scenarios listings page.
This is a searchable field, make sure the title reflects the scenario content.
Description: The
description should indicate the purpose or learning objectives of the scenario.
Version: For clarity you can provide a version number for your scenario. This is useful if your scenario is updated on a regular basis.
Authors: List the contributors, once again this is a searchable field.
One Play: Allows users to Play only once, applicable when wanting to use for assessment.
Hidden: This option hides the scenario from being listed within the Scenarios page. The scenario will still be visible to the scenario owner and others that have edit permissions. NB: Hiding a scenario from the main listing is not the preferred method for securing a Scenario.
Public can Play: If
this option is selected anonymous users will be allowed to play
the scenario. Note: No usage tracking is enabled for anonymous
users.
Creation Date: Non-editable. This field records the date the scenario was uploaded to the server.
Active from and to Dates: The from and to dates limit the use of the scenario to only the defined period. It is possible to just set a from date without an to date.

Scenario and Thumbnail/Icon Image Files: This component of the scenario upload form allow you to select the desired scenario file (SBLi Builder format) from your local hard drive (or network drive) along with an representative image used in the scenario listing.
If an image is larger than the defined thumbnail size (80 x 80 pixels) it will be re-sized automatically.
Add Files button: Allows the selection of the scenario file (.sblib) and an image file (.jpg or .gif or .png) in any order.
Start Upload button: Once the scenario file and/or Image file have been selected on your local computer click the start upload button. This will transfer the files to the SBLi Server. After the upload has occurred your files will be listed within the upload component.
Cancel Upload button: If your scenario is very large or you have a slow connection you can at anytime cancel the upload process.
Delete files button: Once the files have been uploaded they will be listed within the upload component. You can change your mind about what files to upload at anytime before saving the scenario to the SBLi Server. To remove an already uploaded file select it from the list and click the 'Delete files' button.
Save button: After you have finished entering in the desired information and settings for the scenario click the save button. If all required field have filled out correctly and no other issues have been detected for the scenario the scenario will be saved to the server and will appear in the scenario listings.
NOTE: Once a scenario has been saved to the server you still may need to assign permissions to it (e.g. Play, Usage tracking), unless you had selected the 'Public can play' option and did not want any scenario tracking etc.
Delete: by clicking on the delete button to the left of the scenario.
Edit: Click on the edit icon to the left of the scenario requiring edits.
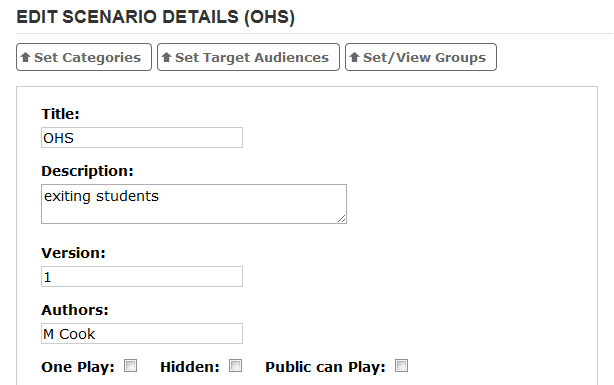
Edit Scenario Details page
Editing a scenario will bring up three new options:
Set Categories: This will take you to the Categories page where you can see the categories already assigned and, add or delete categories as required.
Set Target Audiences:This will take you to the Target Audience page where you can see the Target Audiences already assigned and, add or delete Target Audiences as required.
Set/View Groups: Allows you to select the Groups you want to Play your scenario, also includes options to track and view logs.
Scenario Permissions
Each scenario uploaded to the SBLi Server can be made publicly accessible or restricted to a defined group that contains one or more registered users. To make a scenario publicly accessible, that is allow anonymous users to play, select the 'Public can play' option either during the scenario upload process or when editing the details of a scenario.
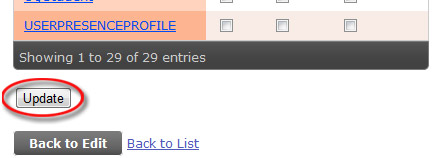
For a private scenario (limiting access to those within a defined group), we need to assign groups to the scenario. To do this select the Permissions button within the scenario action icons. You will then be presented with a list of all the user groups within the SBLi server. These groups have been either created by the SBLi Server administrator or have been created automatically from the use of LDAP/Active Directory the SBLi Server has been attached to. To assign a group permissions on the selected scenario tick the desired check boxes next to the group.
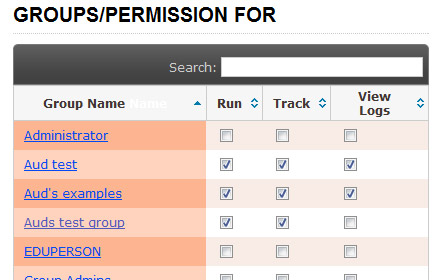
The options for each group are:
Run: Allows any user
within the group to run (play) the Scenario.
Track: Must be used in
conjunction with the Run option. Any user within the group will
have their scenario usage tracked and logged.
View Logs: Allows all
users within the group to view the usage logs of the scenarios online.
Once you have set the groups and their permissions click the 'Update' button at the bottom of the page. To remove groups and/or their permissions just un-select the check boxes and click the 'Update' button.